Practicing yoga requires you to use many different muscles and parts of your body, with a strong focus on your upper body, your arms, and your legs. If one of these parts is not feeling the best or is sore, especially your wrist, you will want to be careful because stressing out your wrist even more, can end up causing more damage.
If you have injured your wrist, you will need to modify your yoga practice in a few ways to ensure you do not prolong the injury. You should avoid certain poses that require you to bear your body weight on your wrists and incorporate ones you can modify, such as a plank to a forearm plank.
If you are practicing yoga, you will be putting a lot of weight on your wrists with many of the most common yoga poses. With them being such small joints, this can cause an injury or end up worsening one if you do not take the steps that we mention below to modify your yoga practice. So, read on!
Wrist Injuries: What Poses to Avoid During Your Yoga Practice
There are many poses that can put more pressure and weight on your wrists than they were built for. So if you have an injury in your wrist, it is important to avoid these poses in your yoga practice at all costs. After you read through this, you can keep reading this article to find out what poses you can do with a wrist injury.
Here are the poses you must avoid during your practice, as they would require you to bear your entire body weight on your wrists:
- Crane (Crow) Pose (Bakasana)
- Eight-Angle Pose (Astavakrasana)
- Peacock Pose (Mayurasana)
- Firefly Pose (Tittibhasana)
- Shoulder Pressing Pose (Bhujapidasana)
- Handstand (Adho Mukha Vrksasana)
Here are other poses that require you to put some of your body weight on your wrist and could be more easily modified by bringing your forearms to the ground for support versus using your wrists:
- Plank Pose
- Side Plank Pose (Vasisthasana)
- Upward-Facing Dog Pose (Urdhva Mukha Svanasana)
- Downward Dog
It is best to avoid all of these poses, especially the ones mentioned in the first list.
As for the second list, if a modification can be made to avoid putting weight on your wrists, you should be fine to do these poses.
What Poses You Can Do During Your Yoga Practice
There are many poses within yoga that you can do that do not involve your wrists, even more, if you consider the modifications that can be made to some. Below are modifications that can be made, but you are also free to practice as many standing poses as you would like.
Here are modifications you can make to certain yoga poses if you have a wrist injury:
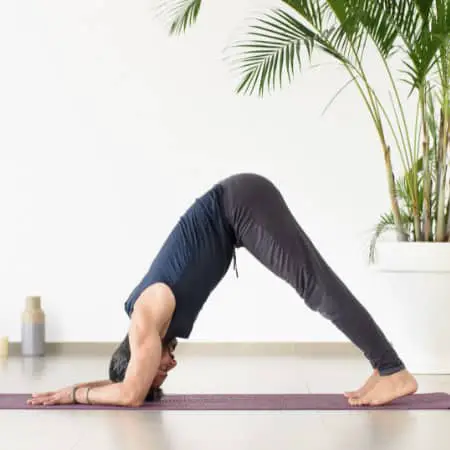
Dolphin Pose Instead of Downward Dog
The dolphin pose is very similar to downward dog. However, the dolphin pose requires you to bring yourself down onto your forearms instead of using your wrists with your arms extended. All the while still allowing you to still feel the stretch in your back and legs.
Squat Instead of Crow Pose
Crow pose requires you to bear all your weight while at a 90° angle on your wrists. Instead, opt for a deep-seated squat with your hands in prayer position at heart center and your elbows pressed against the inside of your thighs. This will help with your balance while protecting your wrists from having an injury for longer.
You can also bend yourself over and reach your arms out as far as you can while remaining in the deep squat. Walk your hands forward and round your spine, bringing your chin to your chest. If you act as if your hands are squeezing a ball, you can improve the muscles in your hands, which will help when you are ready to use your wrists again.
Forearm Plank Instead of Plank
Doing a forearm plank or a side plank is just as good as typical planks, except you are down on your forearms. By doing this, you can still improve your balance, build your abdomen muscles, and get a good stretch while protecting your wrists from being bent and bearing weight.
Forearm Balance Instead of a Handstand
You may even already do forearm balances within your yoga practice because of how similar they are to handstands. Instead of standing on your hands, place your forearms flat on the ground and bring your legs up over your head. You can do this against a wall to help you remain balanced.
Bridge Pose Instead of Wheel Pose
A wheel pose or a back bridge requires you to bend over backward and land on your wrists. Instead, lay down with your feet flat on the floor with your knees up, pulling your pelvic floor up to the sky. Then, extend your arms down to your feet while keeping them flat on the floor; feel free to intertwine your hands under your back.
Poses to Relieve Wrist Pain
If you do not have a serious injury in your wrist and it is actually in need of some stretching and movement, there are some things you can incorporate into your practice to help your wrist flexibility. This includes:
- Extending your arms. Extend your arms out parallel to the floor and flex your fingers on one hand towards the sky. With the other, grab and lightly pull the fingers back towards the body. Hold for 10 to 20 seconds and switch hands when done.
- Clenching your fists. Sit however you like, and place your hands face up on your lap. Clench both of your fists and roll them in towards you. Hold for 10-15 seconds or whatever feels comfortable, then let go and relax.
- Hand-under-foot pose (Padahastasana). Bend at your hips with your legs shoulder-width apart. Bend your knees as needed to bring the back of your hands flat to the floor. Then, place your hands under your feet, essentially, standing on your hands with your toes touching your wrist. Move the weight around and hold for several deep breaths.
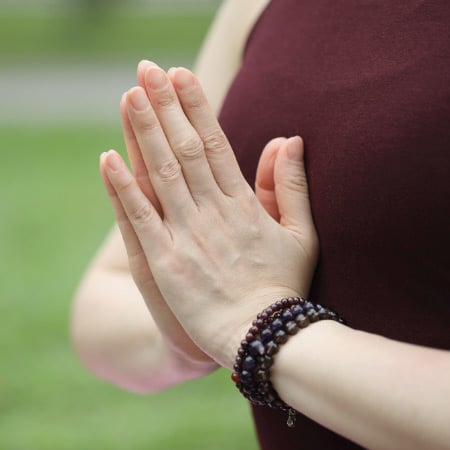
- Prayer position (Anjali Mudra). While standing with your feet shoulder-width apart, bring your hands to heart center in a prayer position. You can control the stretch by pressing your hands together, either harder or softer. Hold for 10-15 seconds and repeat if needed.
- Cow face pose (Gomukhasana). Sit on your knees and bring both your arms out to the side. Bring one arm over your head and bend it back down to touch your back. Bring the other arm bent backward behind your back. If your fingertips touch, pull them in opposite directions to feel the stretch. If not, use a strap and pull that in opposite directions.
Remember: If the pain is intense in your wrists, or you believe you have a serious injury, always consult a health care practitioner and leave out any poses that put weight on your wrists.
Conclusion
Before you start your next yoga practice after a wrist injury, it’s important to know what poses to avoid and what poses you can do instead. By modifying your practice, you are doing yourself and your wrist a huge favor by allowing it the time it needs to heal. If you have a serious wrist injury, avoid any poses that you would be bearing all of your body weight onto your wrists, this will only cause more pain. Instead, stick to poses that you do while standing up, or find ones that you can use your forearms instead to balance your body.