Whether you are just approaching yoga for the first time or looking at deepening your flow, you have come across two particular asanas: bridge and wheel pose. While these are both fantastic postures that can help you open your heart, shoulders, and hips, these poses are also very different from one another. Understanding these differences is crucial to meet your practice’s needs.
Bridge and wheel poses are heart and hip-opening backbends. While also beneficial for expert yogis, bridge pose is more beginner-friendly. This pose is restorative, energizing, and rejuvenating. Wheel pose also focuses on strengthening your legs, arms, and spine while offering an energy boost.
Introducing these two asanas in your practice can be an excellent way to improve your spine’s flexibility and boost your energy level. Find out what suits you best at this moment below.
Bridge and Wheel Pose: What’s the Similarity?

Bridge and wheel poses are powerful backbends that you might have encountered during your practice. While some yogis love the opportunity to explore these poses’ depths and others don’t appreciate them as much, these backbends are extremely important.
Among other backbends, these asanas are great to open the heart chakra, increasing our energy level, building stamina, and encouraging us to reach towards others.
Indeed, the fourth chakra or heart chakra is responsible for self-love, self-compassion, and relationships. Stimulating this chakra can offer you benefits on several levels, including the ability to create and build authentic relationships with others.
Alongside these spiritual benefits, backbends can improve several aspects from a more physical point of view. Some of the physical benefits of introducing wheel or bridge pose in your practice include strengthening the spine, arms, abdomen, and legs.
In turn, strengthening the spine and increasing its flexibility and range of motion can reduce back pain and allow you to move freely.
Now, let’s dive into the differences between wheel and bridge, their benefits, and exclusive tips to elevate your practice.
Bridge Pose: A Brief Overview
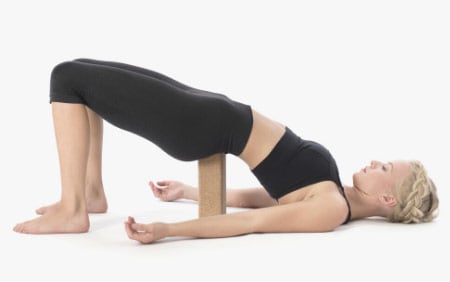
Bridge pose, also known by its Sanskrit name Setu Bandha Sarvangasana, is a staple of hatha yoga. This asana is one of the most versatile and beginner-friendly poses you can introduce in your practice.
While accessible by most yogis, it also yields endless benefits and allows you to start laying the foundations for deeper or more demanding poses. Because of the many bridge pose variations, it can serve you well when you need to cool down or find more energy.
In terms of physical benefits, this pose is excellent for firing up and strengthening the quads, legs, abdomen, and shoulders. At the same time, it is the first step to start increasing the range of motion of your spine and hips.
When testing the bridge pose, ensure that your muscles are warmed up. Deciding to practice a few rounds of Surya Namaskar (Sun Salutation) before trying a bridge pose can help you warm up your muscles and tune in with your body.
Don’t forget to use and leverage the breath to deepen your practice and explore more during your bridge pose. Find out more below.
The Many Benefits of Bridge Pose
When deciding whether to introduce wheel or bridge pose in today’s flow, it is crucial to match the benefits each pose yields with what your body needs. Here’s what to expect from practicing bridge pose:
- It allows you to open your heart chakra, stretching the neck, chest, and spine.
- It energized your legs, especially if you are tired or have been sitting all day.
- It improves digestion by stimulating your abdominal organs.
- It stimulates the thyroid and lungs.
- It might help you relieve symptoms of menopause and period pain.
- It can relieve lower back pain and backache.
Bridge pose also offers some considerable mental benefits:
- It calms the mind.
- It alleviates stress and anxiety.
- It can help you deal better with mild depression.
- It reduces fatigue and headache.
- It can promote better sleep and fight insomnia.
When practiced regularly, bridge pose has been seen to have therapeutic effects for severe conditions such as sinusitis, asthma, high blood pressure, and osteoporosis.
Below you can find a step-by-step guide to start practicing this pose today. However, don’t shy away from the support that yoga blocks can offer you—especially when practicing this yoga to deal with premenstrual syndrome.
How to Access Bridge Pose
While bridge pose is relatively accessible for all yogis, it is crucial to understand your limits. Practicing this pose with mindfulness and concentration is essential to avoid injuries.
- Lie supine on a mat, towel, or floor. If the surface is hard on your neck, place a folded blanket under your shoulder and neck to protect them.
- Bend your knees so that your feet are on the ground. Your heels should be as close as possible to your sitting bone.
- As you exhale, press on your feet, and keep your arms active on the floor. As you do so, push the tailbone upward, firming your buttocks to support your posture. This movement will lift your buttocks off the floor.
- As you start lifting, be mindful that your thighs and inner feet remain parallel. This action will ensure proper alignment.
- Once your buttocks are off the floor, clasp your hands underneath your pelvis. Then, continue to extend the arms towards your heels. This motion will get your shoulders to slide more underneath you.
- Keep lifting your buttocks to bring the thighs parallel to the floor. As you do so, your heel should remain on the ground and your knees over the heels.
- Once you are in this position, you can start slowly lifting the chin from the sternum. As you do so, remember to keep the shoulder blades firm and against your back. Then, as you press the sternum more towards the chin, you will lift the space between the shoulder blades and your neck off the floor.
Remain in the position for as many breath cycles as you need, usually between 30 seconds and one minute. Then, with an exhalation, break your arms apart and release your spine. Do so slowly and with control.
How to Prepare for Bridge Pose
Bridge pose is a versatile and accessible pose from which both beginners and expert yogis can benefit. However, if this pose is not accessible to you right now, you might consider preparing for it through the preparatory poses below.
- Bhujangasana or Cobra Pose: This accessible pose should be a preparatory movement for any backbend you wish to attempt. While it allows you to improve your shoulders’ flexibility, it is also an excellent way to understand the range of motion of your back and shoulders.
- Urdhva Mukha Svanasana or Upward-Facing Dog Pose: It encourages you to lift off the floor while exploring the mobility of your spine and shoulders.
- Virasana or Hero Pose: It allows you to stretch and strengthen your legs and quads.
Wheel Pose: A Brief Overview
If you have already started to feel comfortable in bridge pose and feel like you can give more to your practice, it might be time to try a wheel pose.
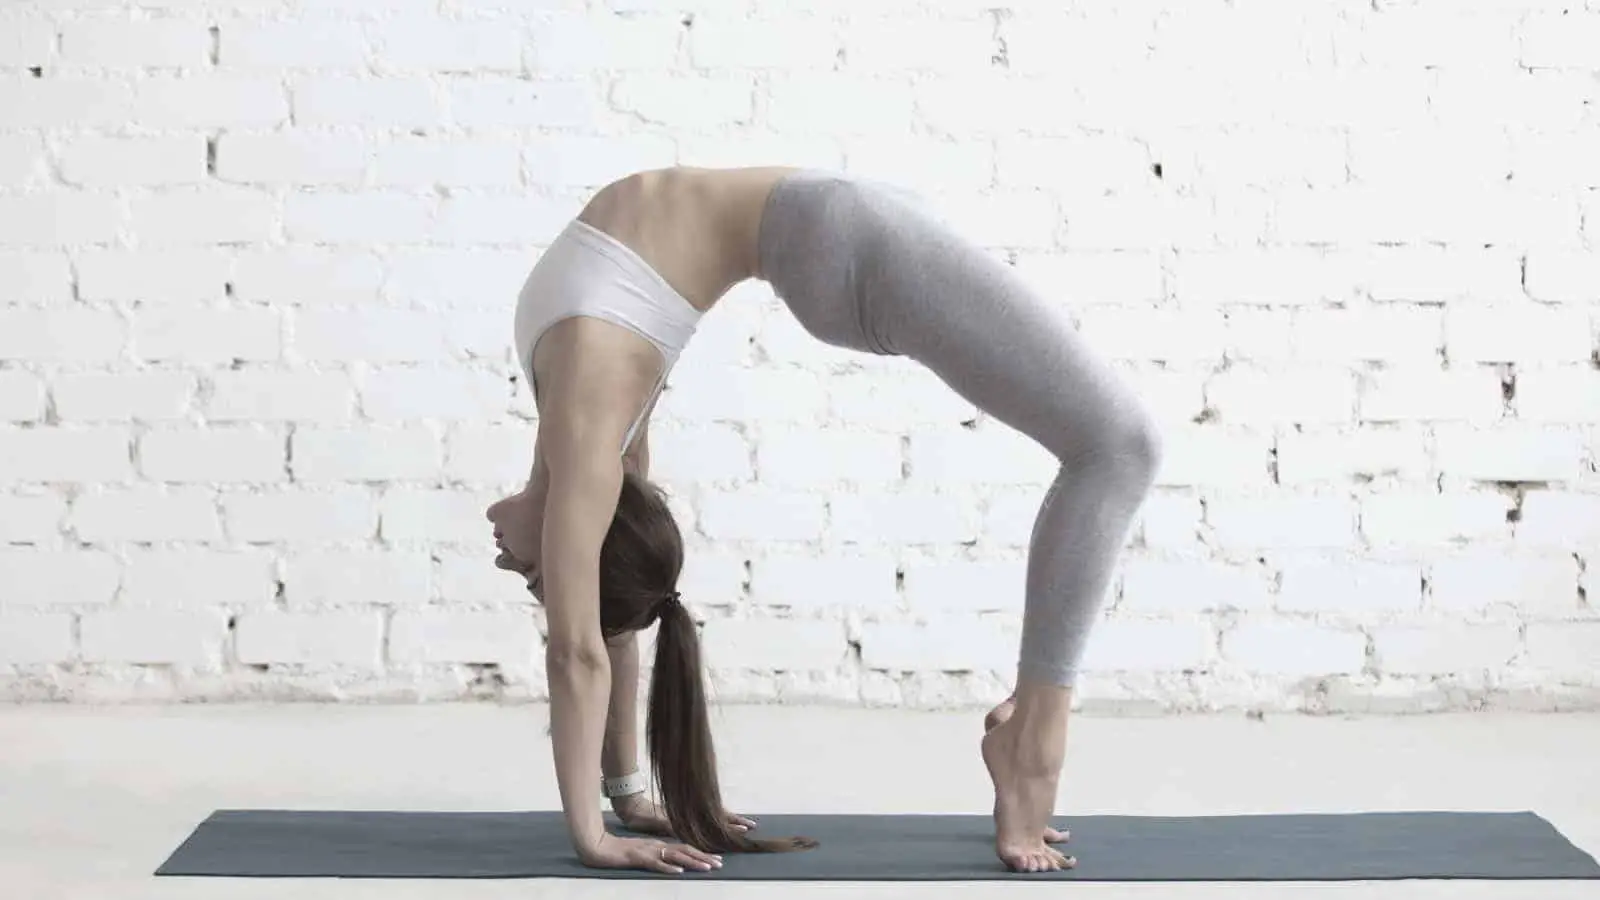
Wheel pose, also known as Upward Bow or, in Sanskrit, Urdhva Dhanurasana, is a deep backbend that will yield several of the benefits of bridge pose. However, because you will rely on your muscles more, it can also be a strengthening posture.
Indeed, introducing wheel pose in your practice is an excellent way to start improving the mobility and strength of your legs, arms, shoulders, neck, spine, and abdomen.
Wheel pose is something that yogis who wish to elevate their practice should try. However, if not appropriately practiced and all the needed cautions, this pose can be risky.
Some of these contraindications include:
- Carpal tunnel syndrome
- Back injury
- Diarrhea and headache
- Changes in blood pressure
Therefore, don’t forget to warm up, approach the pose with mindfulness, and respect your current limits.
Below you will find everything you need for a safer practice.
The Many Benefits of Wheel Pose
Wheel pose is an extremely beneficial asana that allows you to improve your spine’s flexibility and mobility even more. It is also one of the core poses if you wish to experience more complex or demanding asanas.
Some of the benefits it brings to your practice include the ones below:
- It is an excellent way to stretch the wrists, buttocks, abdomen, spine, and legs.
- It opens the shoulders, chest, and lungs.
- It positively influences the thyroid.
- It reduces back pain.
- It stretches the lungs and all the accessory muscles that participate in breathing.
- It stretches the hips.
When regularly introduced in your practice, it can also have therapeutic effects for more severe conditions such as asthma and osteoporosis.
This pose is also one of the most energizing and rejuvenating ones, making it perfect for introducing it when you need an extra energy boost. These effects can also have a relieving effect on symptoms of anxiety, stress, and depression.
How to Access Wheel Pose
If you are aware of your spine mobility and know that the wheel pose is within your range of motion, you can follow the steps below. If this is your first time attempting the pose, it is recommendable to try the bridge pose first so that you can get a better awareness of the range of movement your spine is capable of.
- Start by lying on your back on the floor or a yoga mat. Then, your knees need to be bent, so the soles of your feet are on the floor. Just like for bridge pose, ensure that the heels are as close as possible to your sitting bones.
- Bend your elbows and reach backward, behind your head. Your palms need to be placed on the floor and spread your fingers wide. When doing so, ensure that the forearms are perpendicular to the floor. The fingers should be pointing towards your shoulders.
- Press your feet to the floor. As you exhale, push up your tailbone, supporting the posture through by firming the buttocks. Lift the buttocks off the floor in the same manner as per the bridge pose. While doing so, keep your thighs and feet parallel at all times. Take a few rounds of breath.
- Press the inner hands into your mat and start to lift off. This movement will allow you to place the crown of your head on the mat. Remain in the position for a few cycles of breath, ensuring that your arms are parallel.
- Press on both your hands and feet, ensuring that your shoulder blades are against your back. With an exhalation, push upwards, lifting your head off the floor.
- Once you are off the floor, firm your legs and thighs, and ensure that they remain parallel and not pointing outwards.
- Continue lifting and deepening the pose with your breath. As you do so, bring the pubis towards the navel.
- Let your head hang softly or continue to look down toward the floor.
You can remain in the position for as many cycles of breath as it feels comfortable; usually, this will be between 5 and 10 seconds at a time. To practice it further, repeat the movements above up to 10 times.
How to Prepare for Wheel Pose
Wheel pose is not one of the easiest asanas to practice, especially for beginners. It involves both a backbend and an inversion—characteristics that will require you to be aware of your body limits and strength level.
Nonetheless, you should not miss out on the benefits it can offer, so you can start working towards it by practicing the preparatory asanas below.
- Bhujangasana or Cobra Pose: This is an excellent starting point for all backbends. It can also serve you as a warm-up for your spine and shoulders before wheel pose.
- Kumbhakasana or Plank pose: It can help you prepare your wrists and increase your core’s strength and stability.
- Salamba Bhujangasana or Sphinx Pose: This is a mild backbend that allows you to start building awareness of your spine and shoulders.
If you have been struggling to get into wheel pose, you need to remember that, in most cases, this does not depend on your strength. Indeed, if you can hold a plank pose for a few cycles of breath, you will likely be strong enough for the wheel pose.
However, many factors might play a role when practicing this backbend. Firstly, if your armpits or groins are tight, they might stop you from enjoying your whole range of motion.
Additionally, your attitude towards this pose can make a substantial difference: using your breathing and taking your time getting to this pose is crucial. So, use your breath to calm your mind and focus on bringing awareness to your body.
Bridge vs. Wheel Pose: Which One Is Right for Your Practice?

When practicing backbends, it is crucial to stay present and use your breath to experience the asana more deeply. However, listening to your body is the only way to find out what backbend is right for your practice at the time being.
Sometimes, you might just opt for the calming effects that bridge pose can bring you, even if you already feel comfortable in wheel pose. Remember that your yoga flow should be fluid and serve you in the best way.
Undoubtedly, learning how to perform wheel pose can bring you increased flexibility and strength—and it is always beneficial to always have the option to bring it into a flow. Nonetheless, every yogi is different, and a bridge pose might bring you enough stretch and extension in certain situations.
Going From Bridge to Wheel Pose
If you already feel comfortable in the bridge pose, you might progress from here into a wheel pose and benefit from both poses.
The transition is relatively accessible: start from your bridge pose and then bring your hands next to your head rather than clasping them underneath you. Then, continue with the steps seen above.
You might also decide to use blocks by your head to help you get into the backbend. However, you must secure them against a wall or cover them with a non-sleep towel or sheet. This strategy can help you experiment with the pose while also supporting it and preventing injuries.
Ensure you are just as mindful when you exit the pose.
Precautions to Take to Support Your Backbends
As seen above, there are several reasons for which you should start introducing backbends in your practice today. However, since the spine, hips, and several vital muscles are involved in this type of movement, it is crucial to take all the precautions to keep your practice safe and enjoyable.
Here is what to do in preparation for a wheel or bridge pose:
- Do a proper warm-up. Backbends encourage our spine to bend the opposite way than we do during normal daily activities. Without a proper warm-up, this can make the poses potentially dangerous.
- Practice asanas that can assist you in exploring backbends. These might include the Reclined Hero pose (Supta Virasana) and Locust Pose (Salabhasana).
- Be honest about your skills. Remember that your yoga practice is a journey. While wheel pose might not be accessible today, opting for bridge pose instead can offer you excellent benefits and help you build the foundations for deeper backbends.
Conclusion
Both bridge and wheel pose are beautiful backbends that can bring an endless range of benefits to your body and practice. While similar in their beneficial aspects, they are incredibly different, and they might require other skills.
Bridge pose, always available to beginners to a certain extent, can represent your first approach to backbends. It can also encourage you to work more on alignment and opening of the heart and shoulder.
A wheel pose might become accessible once you are comfortable in bridge pose and can help you benefit from a deeper backbend.